Pre-Requisites of Installation
- The environment is set with the next physical characteristics:
- Windows 7 Professional 64 bits
- Intel (R) Core (TM) i5-4200U CPU @ 1.60GHz 2.30 GHz
- 6 GB in RAM
- Download the next software:
- jdk-7u75-windows-i586.exe
- fmw_12.1.3.0.0_infrastructure.jar
- fmw_12.1.3.0.0_odi.jar
- Installing of JDK 7
- Choose the installation path
- Finish the process of installation
- Add the environment variables
- Check the value of the variables
Installation of the Infrastructure 12.1.3.0.0
1. Execute the file.jar whit command java –jar fmw_12.1.3.0.0_infrastructure.jar
2. Wait to that the process continue and click on Next
3. Choose the installation directory and click on Next
4. Choose the option “Infraestructura de Fusion Middleware” and click on Next
5. Wait to that finish the process of validation of requisites of system and click Next
6. Click on “Install” for installation confirm
7. Click on Next for continue with the process
8. Click on “Terminar” for finish the installation process
Installation of ODI 12.1.3.0.0
1. Execute the file.jar whit command java –jar fmw_12.1.3.0.0_odi.jar2. Wait for the process to finish loading files and click on Next
3. Choose the directory of the infrastructure previously installed and click on Next
4. Choose the installation the Enterprise type and click on Next
5. Wait to that finish the process of validation of requisites of system and click Next
6. Click on "Instalar" for confirm the installation
7. Click on Next for continue
8. Click on "Terminar" for finish the installation process
Installation of RCU for odi 12.1.3.0.0
1. Access to the infrastructure path C:\Oracle\fmw12c\oracle_common\bin and execute the file rcu.bat
2. Wait for the process to finish loading files and click on Next
3. Choose the option "Crear Repositorio"
4. Write the correct data of connection to the DB
5. Click Aceptar on the emergent window
6. Choose the option "Crear Nuevo Prefijo"
7. Click Aceptar on the emergent window
8. Write a password for the schemas
9. Write the data next:
Contraseña para el usuario SUPERVISOR: ***
Tipo del Repositorio de Trabajo: D
Nombre del Repositorio de Trabajo: WORKREP
Contraseña para el Repositorio de Trabajo: ***
Algoritmo de cifrado: AES-128
10. Click on Next for continue
11. Click Aceptar on the emergent window
12. Click on Crear for confirm the creation of the schemas
13. Click on Cerrar for finish the process
Creation of the Domain
1. Access the directory C:\Oracle\fmw12c\oracle_common\common\bin and execute the script config.cm2. Choose the option "Crear Nuevo Dominio". Write Name and path the domain and click Next
3. Choose the products to install and click on Next
4. Write the credentials for the Administrator user
5. Choose Production Mode and check the JDK
6. Write the correct information of the schemas and click Next
7. Click on Next for continue with the process
8. Check that the tests are successfull
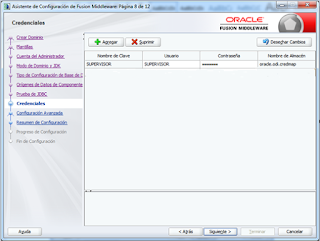
9. Write the credentials for SUPERVISOR user
10. Choose the next options and Click on Next
11. Leave the defaults and Click on Next
12. Write the values for NodeManager and Click on Next
13. Write the values for Managed servers and Click on Next
14. Click on Next
15. Leave the defaults and Click on Next
16. Write the Machine Name for the Domain
17. Set the servers to the machine
18. Leave the defaults and Click on Next
19. Write the values for OracleDIAgent1 and Click on Next
20. Set OracleDIAgent1 to the machine and Click on Next
21. Click on "Crear" for continue
22. Click on Next for continue
23. Click on "Terminar" for finish the process
Configuration to the Enterprise Agent
1. Start Adminserver and odi_server1
2. Navigate to Deployments in the weblogic console and search oraclediagent. Note that the state is Failed
3. Navigate to Deployments > odiconsole >Test. Click on the first link
4. Login in the odiconsole with the correct credentials
5. Navigate to Exploration > Topology > Agents
6. Right-click on physical agents and choose Create
7. Write the values for new agent
8. Now create the Logic Agent. Right-click Logical Agents > Create
9. Right-Click on the new agent logical and click Edit
10.Check the mapping with physical agent
11. Navigate a Deployments in the weblogic console
12. Start oraclediagent
13. Check that the new state is Active


No comments:
Post a Comment