Wednesday, July 27, 2016

Install and configure Admin Tool with OBIEE 12C - IAAS Cloud


First of all you need to install the client required, the file:

Setup_BI_Client_12.2.1.0.0_Windows.X64

you can download it en the oracle web page, or e-delivery.

http://download.oracle.com/otn/nt/bi/1221/Setup_BI_Client_12.2.1.0.0_Windows.X64.zip

once you have installed, we proceed to configure it in order to allow connection,

we need first, configure tnsnames.ora.

1.- Navigate to C:\Oracle\Middleware\Oracle_Home\network\admin
(if the folder doesn't exist create it)

2.- Create file tnsnames.ora pointing out to the database you want to connect.

example:

# tnsnames.ora Network Configuration File mntopc_dataproduct12.1.0db_1networkadmintnsnames.ora
# Generated by Oracle configuration tools.

CLOUDCDB1 =
  (DESCRIPTION =
    (ADDRESS = (PROTOCOL = TCP)(HOST = db_private)(PORT = 1521))
    (CONNECT_DATA =
      (SERVER = DEDICATED)
      (SERVICE_NAME = cloudcdb1)
    )
  )

CLOUDCDB1_PDB =
  (DESCRIPTION =
    (ADDRESS = (PROTOCOL = TCP)(HOST = db_private)(PORT = 1521))
    (CONNECT_DATA =
      (SERVER = DEDICATED)
      (SERVICE_NAME = pdborcl)
    )
  )

3.- Configure DNS System Entries

The port 9514


4.- Select the tables as you desire and build your model

Tuesday, July 26, 2016

Linux IAAS, Usefull commands

One you have attached a volume here you have usefull commands:

Disk information:

lsblk
blkid

Mount: sudo mount /dev/xvdc /mnt/opc_data

Format : sudo mkfs -t ext3 /dev/xvdc

Install if needed:
sudo yum install e4fsprogs

Create folder if needed:
sudo mkdir /mnt/opc_data

mount as default:
vi /etc/fstab

add following line:
/dev/xvdc               /mnt/opc_data        ext3    defaults        0 0

Change user and group one command:
sudo chown opc:opc opc_data/

Check if process is on startup:
chkconfig --list | grep vncserver
"vncserver       0:off   1:off   2:on    3:on    4:on    5:on    6:off"

install vncserver if not installed:
yum install tigervnc-server

Put vncserver on startup:
sudo chkconfig vncserver on

Configure vncserver once installed (modify according your settings)
cat  /etc/sysconfig/vncservers

VNCSERVERS="2:opc 3:oracle"
VNCSERVERARGS[2]="-geometry 1280x1024 -nolisten tcp -localhost"
VNCSERVERARGS[3]="-geometry 1280x1024"

Restart Service

sudo service vncserver start
sudo service vncserver stop


sudo service vncserver status

Use vncpasswd to change password users
vncpasswd opc

If you don't have xterm install it
sudo yum install xterm

Enable X11Forwarding
sudo vi /etc/ssh/sshd_config

Restart sshd
sudo /etc/init.d/sshd restart

With operative systems with no graphic interface, but you want enable vncserver:

gconftool-2 -s -t bool /apps/gnome-screensaver/lock_enabled false
vncserver :3 -depth 16 -alwaysshared -geometry 1200x1024 -s off

sudo yum install xorg-x11-twm
sudo yum install xterm
sudo yum install xsetroot
sudo yum install xorg-x11-apps

Add LC_ALL=en_US; export LC_ALL=en_US in .bashrc or in .bash_profile 

sudo yum install liberation-sans-fonts

same procedure as vncserver

search text in files recursively in a folders and subfolders:
grep -rl 'windows' ./ | xargs sed -i 's/windows/linux/g'

grep -rnw . -e 172.28.88.111 --exclude-dir={*.out,*.log}
grep -rnw . -e 172.28.88.111 --exclude={*.out*,*.log*}

using escape character: 
grep -rl '/opt/oracle/obiee/user_projects' ./ | xargs sed -i 's/\/opt\/oracle\/obiee\/user_projects/\/opt\/oracle\/admin\/user_projects/g'

Create aliases .bash_aliases file, Example:
alias startobi='sh $ORACLE_BI_HOME/bitools/bin/start.sh'
alias stopobi='sh $ORACLE_BI_HOME/bitools/bin/stop.sh'

Disable firewall
systemctl disable firewalld.

.bash_profile example

Sometimes, operative systems users don't come with bash profile file, here you have an example of
this file and common environment variables in a Oracle installation.


# .bash_profile
# Get the aliases and functions
if [ -f ~/.bashrc ]; then
        . ~/.bashrc
fi

# User specific environment and startup programs

PATH=$PATH:$HOME/bin

export PATH

# Oracle Settings
export TMP=/tmp
export TMPDIR=$TMP

export ORACLE_HOSTNAME=cbaf0b
export ORACLE_UNQNAME=cloudcdb1
export ORACLE_BASE=/mnt/opc_data
export ORACLE_HOME=$ORACLE_BASE/product/12.1.0/db_1
export ORACLE_SID=cloudcdb1

export PATH=/usr/sbin:$PATH
export PATH=$ORACLE_HOME/bin:$PATH

export LD_LIBRARY_PATH=$ORACLE_HOME/lib:/lib:/usr/lib
export CLASSPATH=$ORACLE_HOME/jlib:$ORACLE_HOME/rdbms/jlib

export JAVA_HOME=/usr/java/jdk1.8.0_91
export JRE_HOME=/usr/java/jdk1.8.0_91/jre
export JDK_HOME=/usr/java/jdk1.8.0_91

export PATH=$JAVA_HOME/bin:$PATH

Cyaaa !!

Install OBIEE 12c IAAS Oracle Cloud


Step  1: Java

bash-4.1$ sudo rpm -Uvh jdk-8u91-linux-x64.rpm
Preparing...  ########################################### [100%]

jdk1.8.0_91 ########################################### [100%]

Step  2: Install Infra


To fix this error:

sudo yum install gcc-4.4*

sudo yum install glibc-devel-2*


Step 3: Create the repositories

cd /mnt/opc_data/Middleware/obiee12c/oracle_common/bin
./rcu

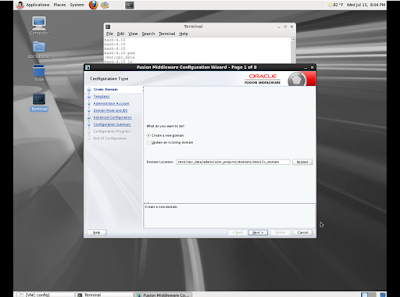
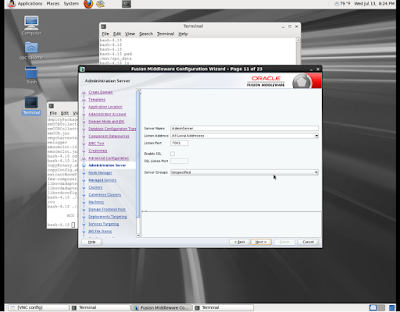
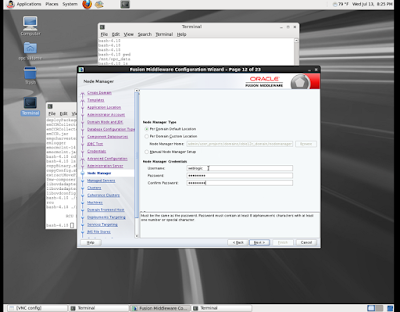
Step  4: Configure domain

Change location to and execute config.sh

/mnt/opc_data/Oracle/Middleware/bi/bin


Then you will be able to access Bi system:


Create Windows VM on Oracle Cloud Compute

  1. Log in to Oracle Cloud Marketplace at https://cloud.oracle.com/marketplace/faces/homePage.jspx.
  2. From the Products drop-down list, select Infrastructure (IaaS), and then select Compute Cloud.
  3. Enter the name of the image that you want to use in the Search bar at the top of the page and click Go.
  4. The search results are displayed.
  5. Select the image that you want to use by clicking it.
  6. You’re directed to a page with more information for the selected image.
  7. Click Get App.
  8. Accept the terms of use and click Next
  9. If you see a message asking you to enable permission settings by clicking Preferences in your Oracle Compute Cloud Service account, follow the instructions to enable the setting. Then return to Oracle Cloud Marketplace and click Get App for your image again.
  10. Select the required account from the drop-down list and click Next.
  11. Review the information on the Review screen and click Submit Request.
  12. You’ll receive an email notification confirming that your application has been installed.
  13. On the Confirmation screen, after your request is confirmed, to create an instance, click Start Compute Console.
  14. The Create Instance wizard starts.

This app requires Oracle Compute Cloud Service . Also, to install this app, you must be a service administrator for your Oracle Compute Cloud Service.

We can't continue with the installation because we can't verify that you have the Oracle Cloud services required for this app.

To give us permission to verify your services: 
  1. 1.Sign in to the My Services application.
  2. 2.Click Preferences at the top of the page.
  3. 3.Select the Permission Settings check box.
Once this option is set, we can verify that your Oracle Cloud services meet the requirements for any app you choose to install.

After you set the option, sign in to Oracle Cloud Marketplace, find the app you wanted to install, and click Get App to restart the process.